Usage
Getting started
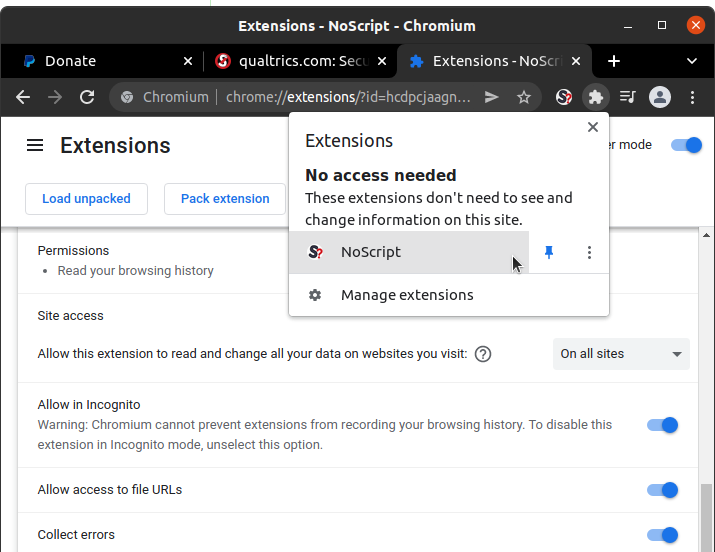
First of all, install NoScript in your browser!
Don't forget to allow NoScript to run in Private / Incognito windows, either when prompted on installation or later in the extensions manager option.
Otherwise you won't find NoScript where you need it the most.
For the same reason, you'll probably want to Pin NoScript's icon to the toolbar, in order to have a visual indicator of what is going on with current page's permissions and a fast way to configure them.

Upon installation, a welcome page lets you decide the way NoScript must assign the initial trust level to unclassified sites, choosing between three "Site Classification Behaviors" (or usability levels), from most involving (but safest and recommended) to most convenient:
- STRICT / Default Deny - The traditional, recommended and most secure NoScript behavior: unclassified sites are marked as DEFAULT. Potentially harmful capabilities, including scripts, are disabled. You can manually enable the sites you trust by opening the NoScript interface and marking them as TRUSTED, or further customize their capabilities by selecting CUSTOM.
- EASIER / Auto - A compromise between security and convenience: the top level site, whose address is shown in the navigation bar, is automatically promoted to Temporarily TRUSTED unless already manually classified. 3d party sites still need to be classified manually. Cross-site protections are still enforced.
- EASIEST / Default allow - The most relaxed behavior: unclassified top-level sites are promoted to Temporarily TRUSTED, and capabilities enabled for the top-level site are automatically cascaded to all its 3rd party unclassified sub-resources. Sites already classified as "UNTRUSTED" and CUSTOM are not affected. Cross-site protections still enforced.

After installation, you can quickly access NoScript:
- on a desktop OS, either
- by left-clicking the NoScript toolbar icon...
- ...or by right-clicking on any web page and selecting the NoScript contextual menu item (most useful on popup windows where the toolbar is hidden)...
- ... or by using the Alt+Shift+N keyboard shortcut.
- on Firefox for Android, by selecting Add-ons in Firefox's main menu and tapping the NoScript entry.
Trust levels
By using NoScript's popup UI you can assign any website or sub-resource origin (e.g. "cnn.com" or "ads-twitter.com") either one of 4 preset trust levels or a per-site customized level.
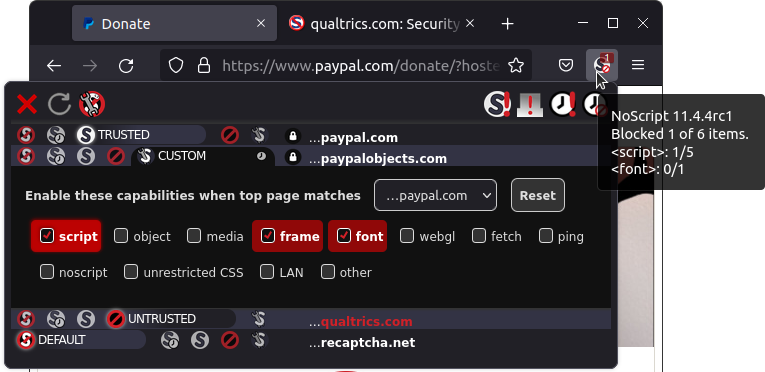
 DEFAULT, as the name implies, is the fallback low trust level which NoScript automatically enforces on any not yet configured website. This way unknown sites you visit for the first time are unable to perform any harmful action against you.
 Temp. TRUSTED is the high trust level you can assign to sites requiring JavaScript or other active (and potentially harmful) capabilities to be enabled in order to work. Temp. stands for "Temporarily", meaning that the trust level for this site gets reset to DEFAULT as soon as the browser is closed or if you use the Revoke Temporary Permissions
 button. This is the preferred way to tentatively enable sites which you need to work just now but you're unlikely to visit every day.
You can also assign this level to all the sites you currently listed in the popup UI by using
the Set all on this page to Temporarily TRUSTED
 button.
 TRUSTED is the permanent high trust level, enabling JavaScript and other active capabilities and persisting across browser restarts: use it only for sites which you really trust and use frequently.
 UNTRUSTED is the zero-trust level, which blocks every capability (including rendering of plain HTML frames and alternate <noscript> content). It may be useful to flag sites which are definitely not welcome in your browser.
 CUSTOM is a special level which can be tailored specifically for each site by turning on and off individual capabilities, such as script, object, media, frame, font, webgl, fetch, ping, noscript, unrestricted CSS, other. Capabilities which the site has tried to use, being blocked by NoScript, are highlighted in red. The temporary/permanent behavior of this level is controlled by a tiny clock-shaped toggle.
Contextual Policies
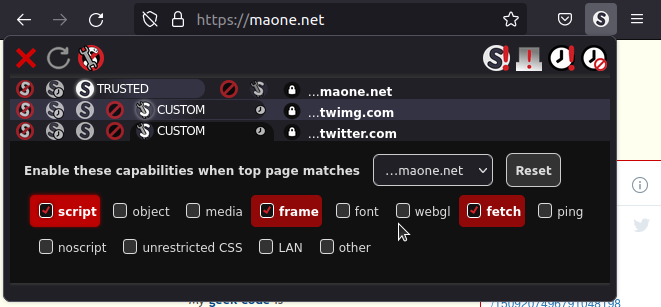
Contextual policies let you assign different permissions (or "enable different capabilities", in NoScript's parlance) to a certain site depending on its context, i.e. which is the top level site (the address currently shown in the navigation bar).
For instance, you might want to enable scripts from twitter.com only if you're visiting maone.net (in order to read the embedded tweet feed) but not elsewhere, because you don't like Twitter to track you everywhere you go:
- While on maone.net, open NoScript's popup and select CUSTOM as the policy for twitter.com. You'll see a new drop down box, initially set to ANY SITE.
- Remove all the capabilities (e.g. script) you don't want Twitter to use on ANY SITE (notice that when CUSTOM is selected first time, the capabilities from the previously selected preset get copied, so if it was DEFAULT you can probably leave them that way).
- Then select ...maone.net from the drop down, and switch script, fetch and frame (the capabilities outlined in red, meaning they're are needed by twitter.com) on.
You're done: scripts from twitter.com are allowed to run only when the main site displayed is maone.net. You can repeat this on any website (including twitter.com itself) where you want Twitter scripts and subdocuments to work normally. If you change your mind, you can reset some or all the contextual policies you previously set in the CUSTOM permissions deck, either on from the popup (only for the current context) or from the NoScript Options>Per-site permissions panel, where all the context sites you had configured plus the ANY SITE default are listed in the Enable these capabilities when top page matches... dropdown.
Preset customization
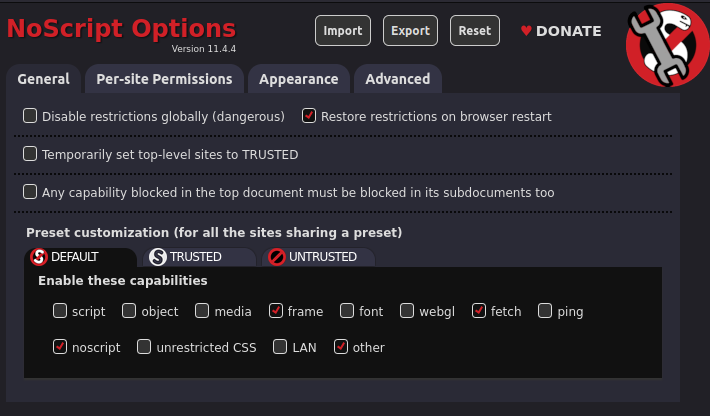
Even though this is not recommended, power users may customize also the built-in presets, from NoScript Options>General>Preset customization. The modified capability permissions will be automatically applied to all the sites which the trust level preset has been or will be assigned to.
LAN Protection
Simply put, the LAN capability lets documents coming from the public Internet (AKA World Area Network / WAN) to link / send requests to hosts inside your Local Area Network (LAN), which is pretty much what they can do now, allowing so called cross-zone CSRF/XSS attacks. By keeping it disabled (the factory setting in the DEFAULT and UNTRUSTED presets), you're replicating the Application Boundaries Enforcer feature from "Classic" NoScript, without the hassle of going through ABE's firewall-like rules when you need to set an exception, which now is just a matter of checking the LAN capability box.
Per-site preferences editor
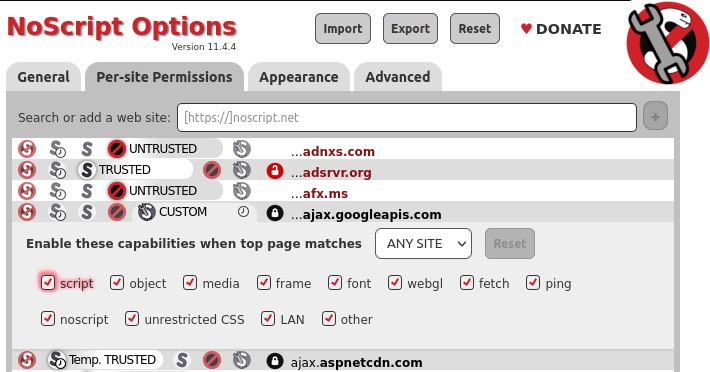
You usually assign trust levels on the fly to the current site and its sub-resources from the popup UI.
But you may also want to assign a different trust level to a site you've previously configured, or to configure new sites without actually visiting them.
In order to do that, just use the NoScript Options>Per-site permissions panel. To make NoScript "forget" the configuration for a certain site configuration, just assign it the DEFAULT preset.
Bulk-disabling restrictions
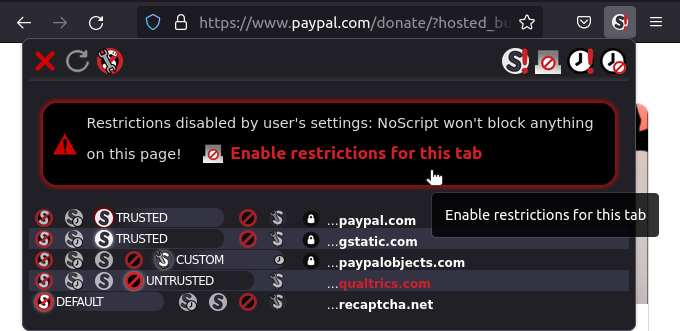
Sometimes you are in a hurry on a complex workflow, spanning multiple redirections through different websites, which must succeed no matter what.
One example may be a credit card payment, bouncing from an e-commerce site to one or more payment processor web services.
In this case you may want to temporarily relax all the restrictions normally enforced by NoScript for all the sites loaded in the current tab until said tab is closed, by using the Disable restrictions for this tab button.
More radical (and not recommended) is the Disable restrictions globally (dangerous) button: using it amounts to disabling NoScripts permanently on any site/tab, keeping enabled the XSS filter only. Don't do it!
Cross-site protections
NoScript provides also protection mechanisms independent from core script blocking: most notably, its XSS Filter and Cross-tab Identity Leak Protection
XSS Filter
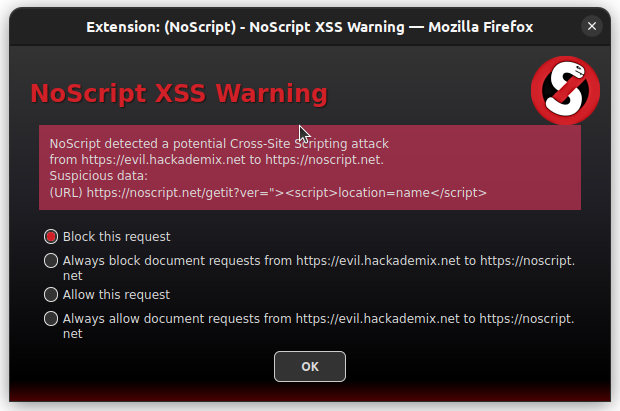
NoScript's XSS filter (also known as "Injection Checker") has been the first one and always the most effective available in a web browser. It prevents requests originating from a certain (possibly malicious) web site from injecting and executing code in a different web site, an attack known as Cross-Site Scripting (XSS). When a suspicious request is detected, a warning dialog is shown for the user to block or allow it, either temporarily or permanently. Exception can be managed from NoScript Options>Advanced>XSS
Cross-tab Identity Leak Protection
NoScript's Cross-tab Identity Leak Protection (or "TabGuard") is an experimental countermeasure against the Targeted Deanonymization via the Cache Side Channel attack by Mojtaba Zaheri, Yossi Oren and Reza Curtmola, presented at Usenix Security in August 2022.
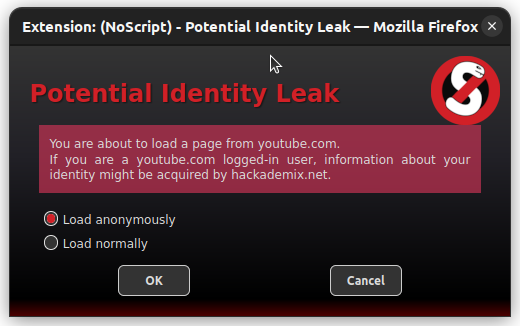
It is loosely inspired by the Leakuidator+ browser extension proposed by the authors as a defense, but it's designed to better integrate with Firefox and the Tor Browser and provide protection against variants of the attack not covered yet. When triggered, i.e. on cross-site requests across related tabs, TabGuard removes the authentication headers from the request and shows a red TG badge near its icon. If you're unexpectedly logged out from a website loaded in a new tab and you can see this badge, you just need to manually reload the page or follow any link, and the authorization will be automatically restored. Only in the rare occurrence of cross-tab cross-site POST requests, which might not be consistently replayed after the fact, TabGuard suspends the load with a Potential Identity Leak warning to provide users with the ability to either "Load anonymously" (preventing the attack but also logging out from the target site) or "Load normally", which may be required by some legitimate cross-site workflows such as online payments, single sign-on and 3rd party authentication systems.
This protection is enabled by default on any Private Browsing window (and therefore in the Tor Browser and in Mullvad Browser), but can be disabled or enabled globally from the NoScript Options>Advanced panel.
Keyboard Shortcuts
You can open and navigate all the NoScript UI by using the following keyboard shortcuts:
Alt+Shift+N     start (open NoScript Popup)
Arrows/Tab      move around
DEL/BKSPC/0     DEFAULT
+               TRUSTED
-               UNTRUSTED
C               CUSTOM
T               Temp
S               HTTPS-lock
HOME            jump to the toolbar
ESC/ENTER       Close the UI
R               Reload current page without closing the UI
Shift+G         Globally disable restrictions
Shift+T         Disable restrictions on this tab
P               Set all on this page to Temp. TRUSTED
F               Forget temporary permissions
User-contributed guides
Limitations on Chromium
The API exposed by Chromium to browser extensions is not as powerful and flexible as its Firefox counterpart. When Mozilla switched for "all powerful" add-ons to the WebExtensions tech (their "clone" of the Chrome Extensions tech), they contracted me to help design and implement improved versions of webRequest and other APIs, specifically suited to support privacy and security extensions like NoScript.
This already provides a significant advantage to Firefox in Manifest V2, and the difference gets worse with Manifest V3, especially hurting privacy and security innovation.
Therefore, even if NoScript is compatible with most browsers, some of its most advanced features are available only on Firefox and its derivatives, such as the Tor Browser.
In details, these are the current limitations imposed to NoScript by Chromium-based browsers such as Google Chrome, Edge or Vivaldi:
- The Injection Checker XSS filter ("Sanitize cross-site suspicious requests") is disabled because there's no asynchronous blocking webRequest API
- The Cross-tab Identity Leak Protection (TabGuard) is unavailable (same reason as above)
- The LAN protection works for numeric IPs but cannot resolve domain names (no viable DNS + request interception API combo)